
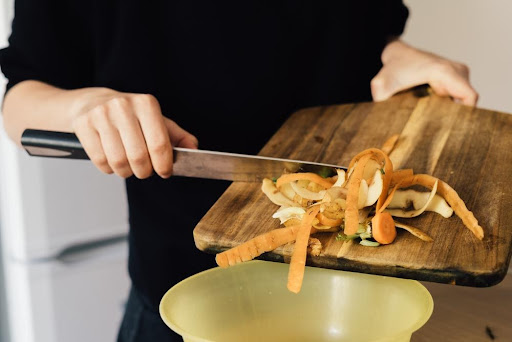
Whether you’re new to composting or compost pro, we have lots of helpful information for you! Composting is used to change organic waste into a nutrient-rich soil amendment. By combining nitrogen-rich (green) material with carbon-rich (brown) material in the right proportions, we can accelerate the breakdown into usable compost. Besides the material you are composting, the other requirements for composting are water and oxygen.
There are two main methods of composting: in a bin or in a barrel. Each has advantages and disadvantages.
Composting in a Barrel
A barrel is a great way to start learning about composting. It is easy to use and requires less work. The organic material is put in the barrel through a hatch, which can then be securely closed. The barrel is mounted on a frame that allows the barrel to be rotated in place, thereby tumbling the ingredients. Tumbling is relatively easy, and it allows the ingredients to mix and keeps the oxygen level high. Another advantage of the tumbler is that because it is a closed container, you won’t have to worry about too much water from rain or snow and it prevents critters from digging into your compost looking for a free meal or a warm place to spend the winter. The biggest disadvantage of the tumbler composter is the size. If you plant vegetable seeds for things like squash or pumpkins, which are late-season crops, you will have a lot of vines left to compost at the end of summer. You will be limited on how much you can put into the composter at a time.
Composting in a Bin
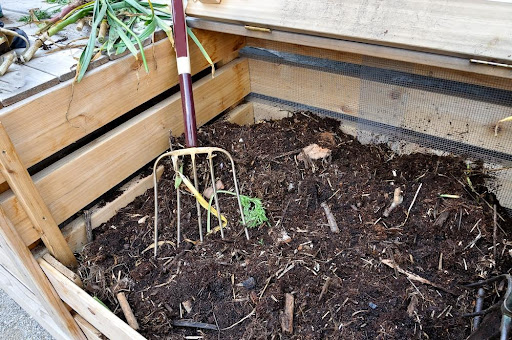
The second type of composter is the bin method. In this method, you construct a bin that is a minimum of 4 feet wide, tall and long. It should be three-sided with the front open to allow you to turn the pile. Some gardeners add the fourth side, but it should be easily removable. Instead of turning a barrel to mix the organic material, the material will be turned over and “fluffed up” with a garden fork. An easy way to do this is to construct at least a two-bin setup and just flip the compost from one bin into the next to aerate the material. This is why the free fourth side on your bin is important. Imagine trying to mix the material from the top of the pile. It is so much easier to work from the side of the pile. Many serious composters add a third bin to the structure. The first is for new material to compost, the second is for partially composted material and the third is for the completed compost that’s ready to use in the vegetable or flower garden.
Once you have your tumbler barrel or your bins set up, you are ready to start composting. If you start in the spring or summer, you will find that composting is pretty quick. You should have usable compost in just a few weeks. Once fall comes and temperatures start to drop, you will notice it takes a little longer to reach the finished compost stage. In winter, you can still compost, but it will be a slower process and the composting process may even stop during extreme cold. These tips will help keep your compost going–even in winter.
Stay consistent with the carbon/nitrogen ratio. Carbon is your brown or dry material. Things
like dried leaves, straw, hay and dried (brown) grass clippings are good carbon sources. Nitrogen will come from your kitchen scraps, fresh grass clippings, coffee grounds and eggshells.
Locate your compost in a sunny location. The warmth of the sun will extend the amount of time your compost is active.
Insulate your compost bin. Surround the bin with bales of straw or hay. Another idea is to fill large bags with dry leaves in the fall. Use them to insulate the compost bin and they also will be a source of material needed for the carbon portion of your working compost during the winter.
Empty the bin. Start the winter with an empty bin. One issue for the bins in winter is they can attract animals. A way to avoid that is to empty the bin and allow the ground to freeze before you start to use the bin. That way, the rabbits will make their burrow some place other than in your bin. Of course, if you are composting in a tumbler, this is not an issue.
Turn less often. While your compost will continue to develop in the winter, as the temperature drops, the speed of composting will slow. If you are located in the North where there are extreme low temperatures, your compost will go dormant until the temperatures rise again. The goal is to keep your compost warm for as long as possible and turning the pile will cool it down.
Keep an indoor compost container. This is a closed container to hold kitchen scraps until it can be moved into the compost bin. When the weather is cold or snowing, it may not be convenient to go to the bin every day.
Bury food waste in the bin. Don’t leave food scraps exposed on the bin. Either dig into the pile and bury them or cover with your carbon source. Animals will smell the food left exposed and become a real nuisance.
Adjust your percentage of brown and green matter as needed. The 4:1 ratio is approximate. If you find your compost is not heating up as it should, you may need to add more green matter. If your pile is too dry, the bacteria that break down the material can’t survive. The pile should be kept damp like a wrung-out sponge. If your pile is getting matted down, air can’t get in, which is necessary for the bacteria to work. Try turning your pile. If your pile has an unpleasant odor, add more dry material. This should also be done if your pile gets saturated from too much rain or snow melt.
Making compost is really very easy and the end result is well worth the effort. Not only will you lessen the burden on the landfill, but you will produce black gold for your vegetable crops and flowers.


